Friday 30 August 2013

Kitty Bee DT - Babies

Hey gang - over at Kitty Bee we have a theme I have never worked with before - Babies! why not pop over and challenge yourself if this isn't something you'd usually play with - or, if its right up your street why not go and show off your creations for a chance to win!

Heres my efforts this week - I was looking for a real bright, easy and simple door hanger - and im sure we all know, not to wake a sleeping baby!


I used the fab Kitty Bee image for this design, the ladybug is so cute sleeping! - i also used some reflective yellow and blue card and some real simple paper flower embelishments, the circled i ran through my texture boutique for some extra detail, and ended with a brad - simple, yet effective!


Challenges:
+Alphabet challenge - one word sentiment
+Jellypark challenges - Things that fly (when he isnt sleeping)
+Stamping for the weekend - colours of summer
+Inky Impressions - Animals

Monday 19 August 2013

Theres a DIVA inside all of us

Hey guys - this post should have gone up yesterday but time just got away from me - but im pleased to have finished part 3 of my ME board... this one reflecting me only a tad, but really wanted to try some new styles so here i am!

My previous posts of my two boards can be found HERE (board one) and HERE (board two)

so without too much chatter, I present, board THREE:


Now, its a shame the pictures will not do justice to the bling, and shine, and sparkle in this pic at all - you almost need sunglasses to look at it!

The one thing i LOVE about this is that i managed to have a play with my meltpot for the first time! a few burns (because im just THAT accident prone) but nothing life-risking!
I took some really borning paper flowers and transformed them into a glittery hard shiny pretty embelishment

I used my melt pot with some clear UTEE and some gold UTEE and then out of the corner of my eye I saw a little bottle of glitter - well! itll either melt and look amazing or burn and blow up the house - so i took the risk and there it is!


And a close up of the results? Adding a little fake-crystal to bling my flowers out further and here they are - SO pretty!!


More details: I used some glittery gold ribbon and tied into a bow, along with a star pin to hold it together, also a little crystal swirl, all from The Ribbon Girl

the paper is also a great find, the gold is really shiny and very textured, the below PP is also full of glitter, I cut the word DIVA with my portrait and added a few tasteful stickles for detail... promarkers to colour my beautify Diva - TGF stamp Wednesday Premire... Distressed with my Tim Holtz ink and also, another detail the camera doesnt quite grab is a silver inked edge around the image....threw it all together and boom! a shiny mess of imagination!


As usual, challenges below - check my sidebar as this creation will also be entered into Dreamtime Designs DT call (click the badge in my sig or below link)

Challenge
+Dreamtime Designs - DT Call
+Addicted To Stamps And More - colour challenge
+The Greeting Farm - Anything goes!
+LaceySunshine - girls girls girls
+Challenges4everybody - Anything goes
+CreativeCorner - Anything goes


All three ME boards together:


Have a fab Monday!

-The-Butterfly.

Sunday 18 August 2013

Clowning Around -( me board)

Afternoon All. Happy Sunday!

I have had a stupidly productive Sunday and have a few projects and posts to show you today

Firstly if you remember HERE - i started my 6x6 'ME Board' where i wanted a collection of boards reflecting all aspects of my personality... the first one representing me pretty well! lol

Well today I have another to show you - this one being SO much fun to make and look at - it also has some real funky details which ill go into, but first, here is my second ME board - something i have always been - The Class Clown!


So, where do I start?!
I used an utterly new colouring style for this lovely Magnola stamp = Tilda dressed as clown. Im very much new to colouring, i tend to blend shades of the same colurs, but on this one i specifically wanted to blend some different colours into eachother, as you can see ive gone from blue, into a green into yellow - im so pleased with how this turned out! im sl glad I was brave enough to give it a go - i must be braver in future :)

There is a special little trick to this board, which the camera unfortunately wont pick up, - My fun little clown does a dance! the images is attached via a small spring so when you move the board, the image wiggles around a little - its much fun to watch (simple things!)

The flowers also add some fab dimension and are all from The Ribbon Girl, the ribbon being from my local craft store, very colourful and glitters, however i couldn't decide which colour to use, so i ended up braiding three - turned out quite good considering i just couldn't decide lol

The background was a piece of card i picked up at my local store ages ago and always found it was too bright and offensive to use - until now! I cut the letters (the 'L' is meant to be backwards) using my portrait and coloured with my markers and stickled it to within an inch of their life!
I used some ranger inks to distress the frame (also cut on portrait) and add some more colour to my little clown friend

I love this board, it really reflects me, mainly back in my school days where i was always the class clown, loved attention and making people laugh - a trait i got from my dad and im very proud of :)

Here are some more pictures - im going to enter this into the Dreamtime Designs DT call - and also have a go at the lovely blog candy! Blog candy - it was made with this challenge in mind but ill also, of course, have a go at the challenges below

Thanks so much for sticking with me - comments always welcome :)


My previous 'Grumpy' board and the new one together, which will eventually be hung with the rest of them


Challenges:
+As You Like It - fave ribbon (braided three lol)
+I Love Promarkers - summertime
+MarvelousMagnolia - anything goes
+Totally papercrafts - fave colours


Wednesday 14 August 2013

WOYWW #129

Well! WOYWW - I have skived the last few, because i have faced the fact that despite naturally, being a very messy girl, i don't like mess in my craft space, and i always tidy after each project, so there's been not much to show for my work-desk the past few week - however, here you find me mid project, oh no not one project, not even two - but gosh-darn it i have three!

this is the state of my workdesk today - i'm looking forward to finishing some projects so i can tidy!! and yes im also aware my 'messy' isn't the same as everyone else's! this is clean compared to some of the desks ive looked at today... but each to their own eh? :)


First mid-project is my gorgeous Magnolia Tilda dressed as clown - details will follow once its done but tried a new colour technique and really pleased with it - im looking for a real bright colourful feel for this one, itll be apart of my ME board eventually


Second is a mid-coloured TGF stamp which ive already found some fab papers for, shes Premiere Wednesday and im looking to bling this one out to the max to match her totally 'Diva' outfit
poking out the corner is a mid DT project which will also be revealed shortly :)


Hope you enjoyed a look into my world - look forward to checking out some more workspaces!

-The-Butterfly

Monday 12 August 2013

Light a candle for magnolia!

I know I'm doing magnolia to death lately but I just cannot help myself!

I saw another 'new' thing a few weeks back. And of course I drooled over it and wanted to make it myself - so I did!

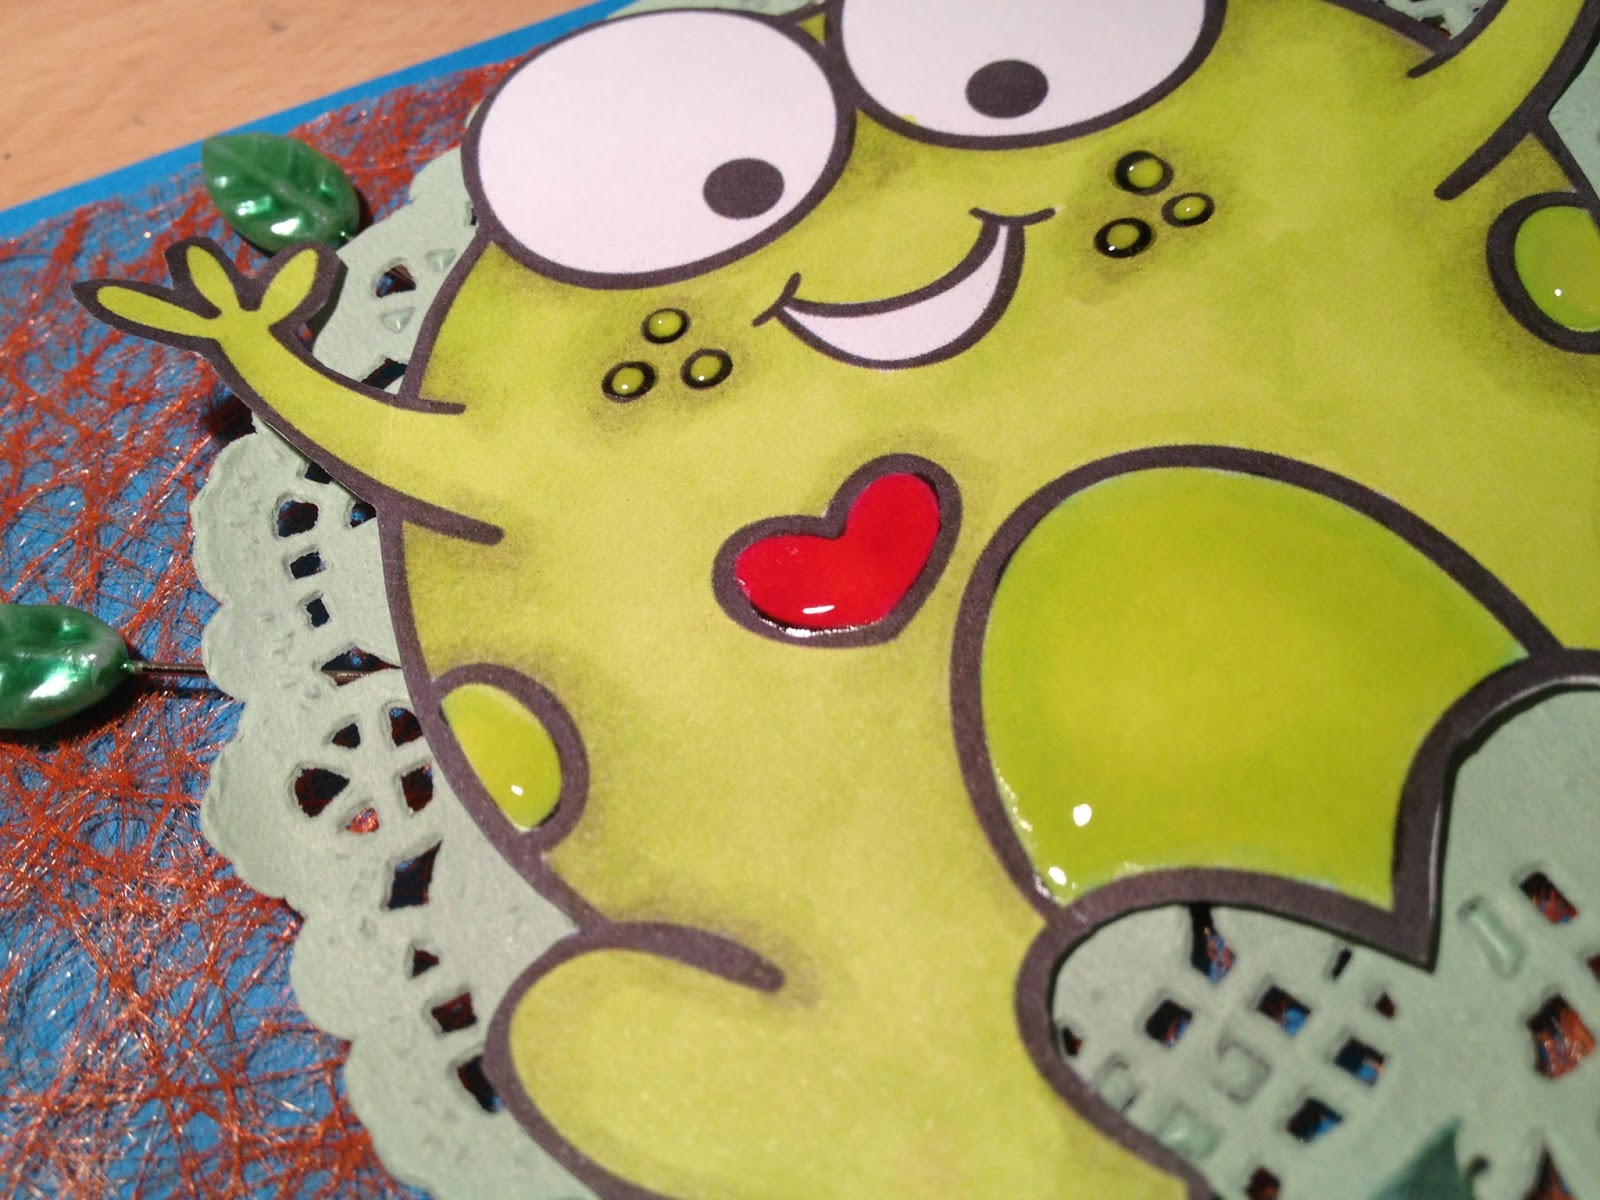
It's 'ok' for a first bash, really it was my typical rush because I wanted to see the end result and overall I'm fairy pleased with the technique

This is my magnolia candle - Do NOT BuRN! It's too pretty to burn!! lol


So - I never knew this could be done until I saw somebody else do it, simple too!

I stamped my image onto white tissue paper, and coloured (oh so carefully as it bleeds a lot!) with my Promarkers, next, I prayed to the gods of non-injury and got my heat gun out... I wrapped the white tissue paper around my white candle (you can use whatever colour I assume, so long as the tissue paper and candle match)
I then wrapped a sheet of baking paper around the whole thing, for some sort of protection and blasted the lot very carefully with my heat gun (mind fingers!)

Before your very eyes you can see the tissue paper melt into the candle and once your satisfied your all melted on, remove the baking paper and hurray, you have a stamped image transferred into the candle, and actually it's a pretty smooth transfer, you'd think it was drawn on!

Don't get me wrong, my colouring could be better with practice on the paper, but I was so keen to actually try this myself I rushed a tad :) (so unlike me eh?)

I then added a few bits to pretty it up, a flower to her hair (and to cover a mistake... Look closely I had a little bleed through the back of the tissue paper)

I added some ribbon because I was tempted to enter this into the DT call for Dreamtime Designs where the theme is 'anything goes with ribbon' but I decided against it because I have two more creations in progress which I think are far better) (watch this space! (Again))

I also felt my little pins would look lovely poking out the candle and I do quite like how you can shove em anywhere! lol

So yes, a few more pics below, I can see some really great gift ideas coming from this idea.. With a bit more practice anyway!


I'll go ahead and enter this into a few challenges for kicks and comments anyway :)

Please, if you have a go let me know! I'd love to see what you do with the idea!


Challenges:
Addicted To Stamps And more - make your mark (using promarkers)
7 Kids - Anything goes with a twist of marker
Magnolia-licious - Anything Goes
Natalie And Amy - celebrate (celebrate love!)
Papertake weekly - Anything goes
Totally papercrafts - Summer Fun
All Crafts Challenge/a> - Anything goes

Sunday 11 August 2013

Floating around...

Morning bloggers - my head is spinning - i have discovered a new love!

A few weeks ago as i was doing what i do best here in blog land (fluttering to other peoples blogs) i came across THIS gorgeous blog but more so THIS fantastic Floating frame! How beautiful is that??!

I had never heard of floating frames before I saw this, and now im in love!  I have been wondering what to put up that's a little different into my bedroom, which has been a work in progress for months! so im hoping this will help hurry me up so i can display it on my wall!  im very pleased with my latest creation:


The frame I brought for about £4 at my local Range, the Vinyl cut was brought from the Silhouette store (by the same designer that did the text for the frame I took inspiration from, and oh i have many more of her's now!) the flower flourish was also found in the store but ive had this a while and just a very easy finishing touch the roses all from The Ribbon Girl.

i must say it took time and patience to put this thing together, im very keen to rush projects to finish them but i made myself go slow and steady with the delicate words! 

I hope you all enjoy, I have plans for another using some rubber stamps! so watch this space!
 Also im really trying to look into Tim Holtz style grunge/distressed work - i absolutely love this style but am way too scared to try any for myself! this blog HERE is the style I want to start creating - so watch this space again! any tips welcome! 

Challenges:
Altered Eclectics - Anything Goes
Anything But A Card - Summer fun (used bright orange and pink summer colours)
Cute Card Thursday - punch or die cut (using portrait)
Natalie and Amy - celebrate something (new decorated bedroom! yay! lol)
Countryview challenges - script/quote/sayings
Papertake - anything goes


Saturday 10 August 2013

Kitty Bee 'School' Mid inspiration

Hey guys! we are still loving the school theme over at Kitty Bee and im here with some mid-challenge inspiration! Sticking to the theme I couldn't think of a better way to use this cute image than for a school lunchbox! what child wouldn't want their sandwiches locked away with Mr bunny?

Gorgeous ribbon from The Ribbon Girl, and the rest i challenged myself to use some scraps, including my doilys which im loving at the mo! to check out more of these cute and so easy to use images, visit the Kitty bee store 


Enjoy!

Tuesday 6 August 2013

Time for magnolia....

Afternoon blogland....

A finished project i hear you cry? oh yes!

Today i have my bargain clock which i have utterly magnola'd!

I found this cute purple clock at my local charity shop for £1.50. its been sat on my desk for the longest time... this is the before photo (well, before but after i started to take it apart)


And now?


Firstly, I used my trusty portrait to cut me a perfect circle with some 12x12 paper - i cant cut generally, so to be able to cut an actual circle - well its a miracle lol
I added a doily and some more numbers cut with my portrait, i embossed the numbers with my new texture boutique and then distressed some some red ink over the purple paper along with the outside of the circle frame

My three magnolias are pretty old stamps now, but still just as cute, especially all in uniform! 
Time is indeed very previous, as they say, so i felt the words are perfect 'Time Fly's, Catch it, Enjoy it. and my tilda's and Edwin are doing just that! I love the little Tilda sitting on the clock, enjoying herself!

I added a few more flowers to the frame and in the middle, from The Ribbon Girl
Mistake 1 - adding the flowers inside the clock, fixing it all together and realising the hands wont go round because they catch on the flowers!! doh!! So i changed them for flatter buttons, again in shades of purple (love this colour, can you tell?)
Images coloured with my trusty markers and words cut using my even more trust Portrait

I hope you enjoy, its a cute little clock and much more interesting than the original, it just needs a battery and it'll hang proudly on my wall :)


 -The Butterly


Challenges:
Magnolia Down Under - distressing
Simply Magnolia - anything goes
7Kids - twist of marker


Friday 2 August 2013

A lovely new DT and challenges!

EDIT TO ADD: the actual finished card - it seems the picture went walkies!

Hey guys, If you haven't noticed the cute little button on the side of my blog, then ill spell it out :) I am now a Very proud member of the Kitty Bee Design Team and below is my first challenge! I really hope you enjoy, Im also setting this to post way in advance so i hope it pops up at the right time!  I was honored to be asked to join their fab team!
Check the challenges and have a go! their so much fun and the images are so fantastic to work with!

So this week our theme is 'School'
here in the UK school is out! so its holiday time for the children here, so what better way to celebrate than with this super cute frog having a Hopping Good Holiday!

I used some orange spiders web over blue card and a cute doily to act as his lillypad and flowers topped with buttons. I also love the Leaf pin's from The Ribbon Girl and think he looks quite at home here!
I cut the lettering using my Portrait and coloured Froggy with Promarkers, I also added some glossy accents to his patches to give him that 'just jumped out of the water' shine!


I hope you enjoy, and be sure to Hop on over to Kitty Bee to play along!
More exciting news from me on its way too - so stay tuned ;)

Challenges entered:
Addicted To Stamps And More - Anything goes
Chocolate Coffee + Cards - colour challenge!
Crafty Cardmakers 1 image (frog) 2 papers (blue and spiders web) 3 embelishments (pins, flowers, buttons)
Creative Creations Challenges - Anything goes
Cute Card Thursday - Anything Goes
Hobby Cutz - Summer
Inky Impressions - Button it!
Natalie and Amy - Celebrate